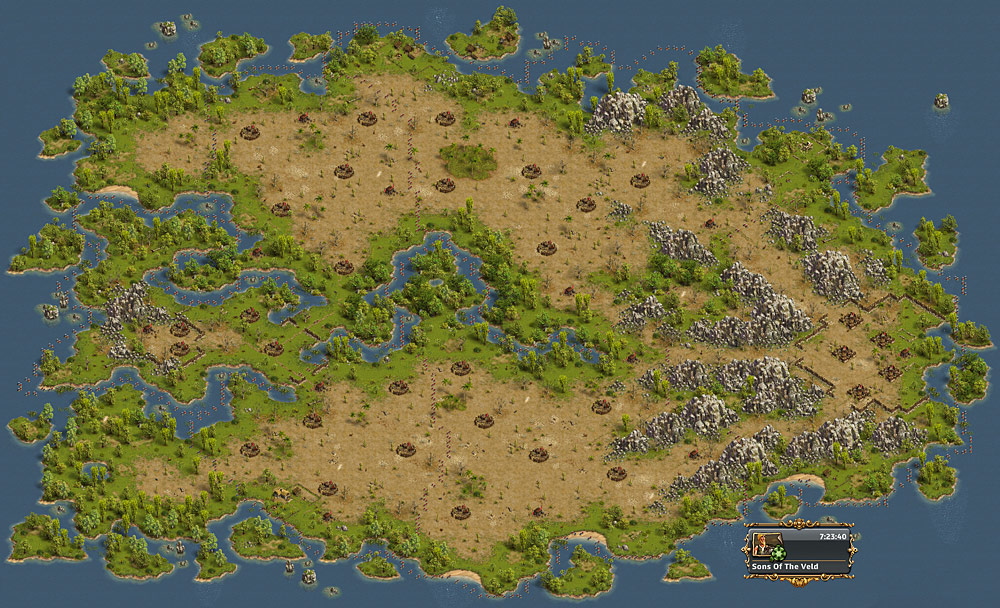
Sons of the Veld Adventure
| Units Required: |
3,938R / 129M / 192S / 150LB / 420C |
| Days to complete: | 8 |
Since this is a very tough map and will take several days to complete you should be expecting to clear 1-2 Sectors per day and be building troops 24hours a day for 3-4days (a Barracks upgraded to level 3 is adequate but level 4 or 5 makes a huge difference to production times).
- Make sure you have the resources for Bronze, Iron & Steel Swords, Horses and Brew before you begin. Preparation will help enormously and be aware of what troops you need to build over night so you can hit the next sector running.
- Double check all second wave hits with the Combat Simulator .. while my garrison attacks should clear them the variable amount of enemies left mean you can tweak and save costly units.
- Another useful tactic is to leave attacks that injure your General for your last attack of the day or when you can be afk for 4 hours.
ALERT
While the majority of the information is correct there are a few problems with the images and numbering.. also new pathing IS an issue so check the camps before you attack. This will be fixed the next time i do the map.
Pretty simple sector, just take out the necessary camps to get to the leaders.
| Sector1 | ||||
|---|---|---|---|---|
| Army: | 560R / 5M / 119S / 115LB / 101C | R401 E145 C183 | ||
| Transport: | G1(200R) G2(37R 5M 119S 39LB) G3(101C 99R) G4(200R) G5(124R 76LB) | |||
| Enemy | Attack With | MMA | ||
| 1 | 80 Thug, 80 Stone | 78R, 2S, 90C, 30LB | R57 E1 C162 |  |
| 2 | 100 Scav, 80 Ranger | 59R, 1S, 101C, 39LB | R36 E1 C183 | |
| 3 | 80 Dogs, 80 Rangers | 81R, 119S | R75 E145 | |
| 4 | Bert, 80 Stone, 50 Thug, 50 Dog | 140R, 5M, 55S | R121 E99 | |
| 5 | 2 Skunk, 100 Thug, 80 Ranger |
Wave 1: 200R Wave 2: 2R, 1S, 82C, 115LB |
R112 E108 | |
| Losses: | (507-555R / 5M / 2-27S) | 401R | ||
A fairly straightforward zone, just take out the obvious camps to get to the leaders.
| Sector2 | ||||
|---|---|---|---|---|
| Army: | 788R / 25M / 65S / 123C | |||
| Enemy | Attack With | MMA | ||
| 1 | 80 Thug, 80 Stone | 78R, 2S, 90C, 30LB | R57 E1 C162 |  |
| 2 | 100 Scav, 80 Ranger | 59R, 1S, 101C, 39LB | R36 E1 C183 | |
| 3 | 200 Dogs | 200R | R39 E181 | |
| 4 | 2 Skunk, 100 Thug, 80 Rangers | 90R, 25M, 25S, 60C | R112 E108 | |
| 5 | Bert, 80 Stone, 50 Thug, 50 Dog |
Wave 1: 158R Wave 2: 12R 65S 123C |
R121 E99 | |
| 6 | Bert, Skunk, 60 Thugs, 60 Dogs | 110R, 90S | R86 E134 | |
| Losses: | (536-615R / 16-25M / 0-15S) |
Pretty simple, position your garrison well and take out the two Leaders, leaving the third for now.
| Sector3 | ||||
|---|---|---|---|---|
| Army: | 379R / 26M / 100C / 120S | |||
| Enemy | Attack With | MMA | ||
| 1 | 100 Dog, 50 Rough | 80R, 120S |   | |
| 2 | Skunk, Bert, 50 Ranger, 50 Rough | 85R, 23M, 40S, 52C | ||
| 3 | Metal, 60 Dog, 60 Ranger, 60 Rough |
Wave 1: 100R, 100C Wave 2: 113R, 12M, 21S, 54LB |
||
| Losses: | (335-379R / 0-22M / 100C) |
Now we need to clear Sector 4 from 2 angles: directly from the West and from the North through Sector 3.
| Sector4 | ||||
|---|---|---|---|---|
| Army: | 623R / 26M / 85S / 100C / 50LB | |||
| Enemy | Attack With | MMA | ||
| 1 | Metal, 60 Dog, Ranger, Rough |
Wave 1: 100R 100C Wave 2: 114R, 14M, 1S, 71LB |
  | |
| 1 | Skunk, 2 Bert,50 Dog, 50 Rough | 137R, 63S | 125R 95S |   |
| 2 | 55 Dog, 55 Ranger, 55 Rough | 149R, 51S | ||
| 3 | Skunk, Bert, 50 Ranger, 50 Rough | 85R, 23M, 40S, 52C | ||
| Losses: | (507-580R / 0-22S / 0-22M / 100C) |
With Sector 4 clear we can make the final strategic strike on Sector 3.
| Sector3 | ||||
|---|---|---|---|---|
| Army: | 212R / 188S | |||
| Enemy | Attack With | MMA | ||
|
1 |
Skunk, 2 Bert,50 Dog, 50 Rough |
Wave 1: 200R Wave 2: 12R, 188S |
125R 95S |   |
| Alternative strike forces |
Wave 1: 137R, 63S Wave 2: 87R, 48M, 65S |
|||
| Losses: | (200-210R) |
Use the camp placement and the attack order to clear the area, this avoids getting distracted by Camp 4 when attacking 3.
Another way is to attack camp 3 and get intercepted by camp 4. After winning camp 4 retreat general. It does not work in other order.
| Sector5 | ||||
|---|---|---|---|---|
| Army: | 738R / 9M / 150S / 54LB / 90C | |||
| Enemy | Attack With | MMA | ||
| 1 | 80 Thug, 80 Ranger | 78R, 90C, 32LB | 57R 1S 130C 32XB |   |
| 2 | 100 Scav, 100 Dog | 81R, 119S | 70R 150S | |
| 3 | 50 Thugs, 100 Dogs, 60 Rangers | 172R, 28S | ||
| 4 | 100 Thugs, 80 Dogs, 40 Rangers |
Wave 1: 200R Wave 2: 50R, 150S |
||
| 5 | Metal, 50 Dog, 80 Ranger, 50 Rough |
Wave 1: 100C, 100R Wave 2: 107R, 16M, 15S, 15C, 47LB Alternative wave 2:125R, 10M, 15C, 50LB (less Militia losses) |
180R40S | |
| Losses: | 691-782R / 100C / 0-3M |
The final sector is a little tricky but nothing another massive army can't sort out. Position army to the West of the final area and take out the first 2 bases. The third needs your attack to be against the Leader to get the distraction to it.
| Sector6 | ||||
|---|---|---|---|---|
| Army: | 817R / 52M / 67S / 150LB / 115C | |||
| Enemy | Attack With | MMA | ||
| 1 | 150 Rough |
Wave 1: 200R Wave 2: 38R, 1M, 1S, 106C 54LB |
148R 1S 71XB |   |
| 2 | 100 Rangers, 100 Rough |
Wave 1: 200R Wave 2: 30R, 1S, 115C, 54LB |
96R 1S 63C 60XB | |
| Hit the leader's camp and get distracted by the camp to the North. There is a 70% chance you will win outright and need to Retreat before hitting the leader. Otherwise you have to hit camp 3 again and then Retreat before taking out the leader. | ||||
| 3 | 100 Dogs, 100 Rough |
Wave 1: 200R Wave 2: (30R, 170S) or 109M, 91S (-109M) |
129R 91S |   |
| While this can be done in 2 waves it will cost you 60+ Cavalry and Militia losses so I prefer to lose Recruits and a few more Longbowmen. | ||||
| 4 | Chuck, 50 Dog, 60 Ranger, 70 Rough |
Wave 1: 50C Wave 2: 78R, 52M, 20C, 50LB Wave 3: 56R, 22S, 22C, 100LB |
Wave 1: 144C (any Gen) Wave 2: 162R 1S 57XB |
  |
| Losses: | 744-815R / 52M / 50LB / 70C | |||
REWARDS